Grosse Pointe North ART
  • Home
  • Classes
    • CG 1 Projects >
      • WELCOME_Assignment
      • Silhouette
      • ANIMALtrace
      • EYE - Digital Illustration
      • PORTRAIT - Digital Illustration
      • LAYER MASK Practice
      • WARHOL_Assignment
      • SPACESCAPE
    • CG 2 Projects >
      • CARTOON Trace
      • PRODUCT Trace
      • SELF-PORTRAIT
      • BACKGROUND/SELF-PORTRAIT
      • WPAP
      • CHARACTER_design
      • COMIC
      • TEXT Effects!
      • 3-D TEXT
    • CG 3 Projects >
      • CG Critique
      • Maggie Taylor
      • FOOD TRUCK Concept
      • FONT_DESIGN
    • PHOTOGRAPHY >
      • PHOTO Critique
      • PHOTO QTR 3 THEMES
      • PHOTO DOUBLE_EXPOSURE
  • EVENTS
  • Student Work
    • Scholastic
  • How To...
  • ART Careers
  • Google ART Project
  • © FREE Images!
  • MENTALhealth_Flier
  • New Page

BLEND TOOL & 3-D TEXT

Picture
​This assignment is intended to be an introduction to the use of the BLEND TOOL in the creation of 3-D TEXT using ADOBE ILLUSTRATOR.
Assignment OBJECTIVE - Become familiar with:
  • PEN TOOL / BRUSH TOOL
  • STROKE
  • FILL with a GRADIENT
  • SELECTION TOOLS
  • SHAPE TOOL(S)
  • GRADIENT TOOL
  • BLEND TOOL​
  • ARTBOARD TOOL
Using ONE ARTBOARD, you will create 3 different designs
  1. DESIGN 1 Using the SHAPE TOOL create 2 different shapes and blend between those shapes using the BLEND TOOL set to STEPS.
  2. DESIGN 2 Using the SHAPE TOOL, create 2 different shapes and blend between those shapes using the BLEND TOOL set to SMOOTH COLOR
  3. DESIGN 3 will contain a 3-D LETTER created with the BLEND TOOL

INSTRUCTIONS

Create a NEW FILE
  • Start with a HORIZONTAL, LETTER-SIZED file
  • You may need to use the ARTBOARD TOOL later to enlarge your ARTBOARD if you need more room...
Practice first by doing some basic BLENDS between shapes
  • In this practice assignment, experiment with using color FILLS and STROKE and NO STROKE
BLEND SHAPES in STEPS​
  • Use the SHAPE TOOL to create 2 different shapes on your ARTBOARD
  • ​Access the BLEND OPTIONS to change how the shapes will blend
OBJECT > BLEND > BLEND OPTIONS...
Picture
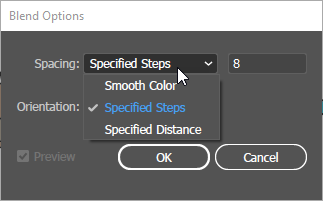
SELECT both shapes and choose
OBJECT > BLEND > MAKE
  • Your shapes should blend blend together - in this case, it will create 8 SPECIFIED STEPS
  • ​Experiment with using the DIRECT SELECTION TOOL to change FILL and STROKE colors
BLEND SHAPES using SMOOTH COLOR​​
  • Use the SHAPE TOOL to create 2 different shapes on your ARTBOARD
  • ​Access the BLEND OPTIONS to change how the shapes will blend
  • This time choose SMOOTH COLOR
  • ​Experiment with using the DIRECT SELECTION TOOL to change FILL and STROKE colors
BLEND TOOL​​
  • You may also use a BLEND TOOL to make the BLEND between the shapes instead of doing the MENU command OBJECT > BLEND > MAKE
CREATE 3-D TEXT​
STEP ONE – Create the letter
  • Create a MONOLINE letter - a letter made with "one line" and has NO FILL
  • If you use a reference - LOCK the layer.
  • Use the BRUSH TOOL to create your letter - you could use the PEN TOOL if you feel more comfortable.
  • Use a reference, or draw you letter freehand.
  • Make your STROKE black and NO FILL
  • HIDE or DELETE your reference layer now if you want


Here I need to expand my ARTBOARD with the ARTBOARD TOOL and I am using the BRUSH TOOL with a reference letter to trace.  Have your stroke be black and have no fill
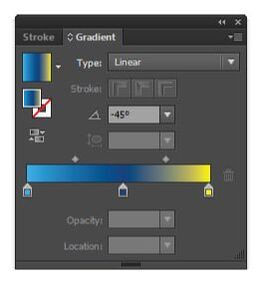
STEP TWO – Create the GRADIENT
  • Use the ELIPSE TOOL to create a circle - hold SHIFT while you are dragging out your ellipse to make a perfect circle.
  • FILL your circle with a 3 color GRADIENT
  • ​Open the GRADIENT PANEL
WINDOW > GRADIENT
  • Click under the slider to add a new point
  • Click on each point to choose a new color
  • GRADIENT need to be LINEAR
  • Set to -45 degree 
Picture
STEP THREE – Create the 3-D LOOK
COPY your circle 15 times CTRL C and PASTE CTRL V
​Now BLEND your circles

OBJECT > BLEND > BLEND OPTIONS
  • Choose SPECIFIED STEPS and set to 1000 (this is the max)
  • SELECT your circles using the SELECTION TOOL
  • Now choose 
OBJECT > BLEND > MAKE
Picture
It should look like this

​STEP FOUR – Create your 3-D LETTER
  • SELECT the new BLENDED object AND your LETTER
  • Go to
​OBJECT > BLEND > REPLACE SPINE
  • The size of your blended shape will affect how your letter looks - you can adjust the size with the SELECTION TOOL or the SCALE TOOL​
Experiment with making a whole 3-D hand-drawn word...
FINE TUNE YOUR BLENDS IF NECESSARY
If you see that some circles didn't blend, you can select them with the DIRECT SELECT TOOL and delete them to make your blend smoother
Picture
Picture
To turn in your file, you need to EXPORT it as a JPEG
  • Make sure your file is named correctly 3-D_textBLEND_lastname
  • TURN IN BOTH the JPEG and the AI files!