
GLOW EFFECT | PHOTOSHOP
In this project you will learn to unlock the GLOW EFFECT in Adobe Photoshop.
This lesson will utilize several new tools and techniques to create a GLOW EFFECT.
This lesson will utilize several new tools and techniques to create a GLOW EFFECT.
- The WORKSPACE
- Using TOOLS - particularly the SELECTION TOOLS including SELECT and MASK...
- Using LAYER MASKS
- FILTERS including BLUR/GAUSSIAN BLUR
- Using ADJUSTMENT LAYERS
- and SAVING your files
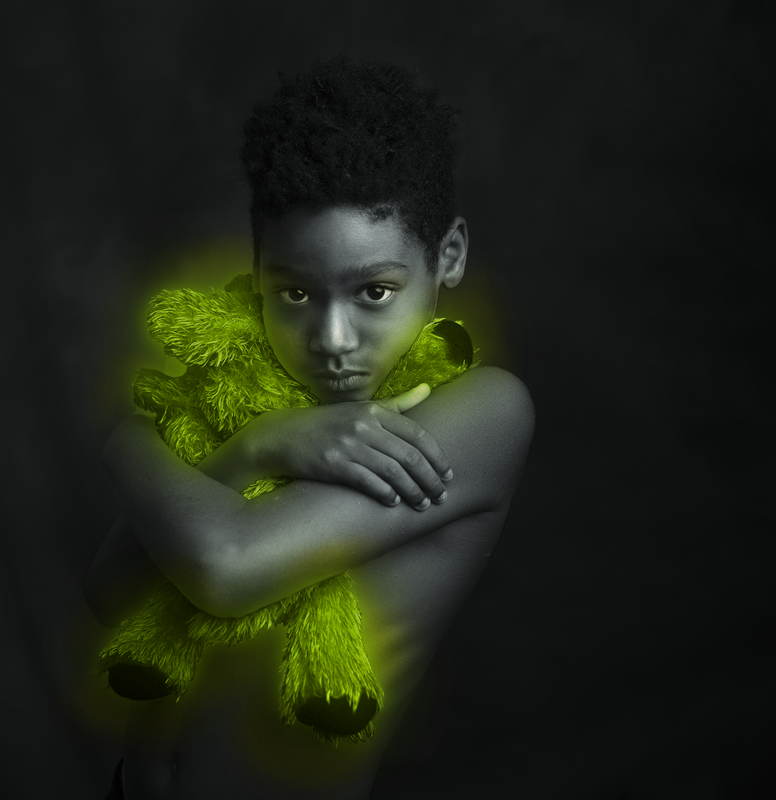
Create a GLOW EFFECT on an object in a photograph
Adding Creative touches
REQUIREMENTS
- ZOOM in and work very closely (if I am grading this zoomed in, you need to work zoomed in).
- Make precise selections and use SELECT and MASK to refine and feather your selections.
Adding Creative touches
- Use your LAYER MASK skill and understanding of ADJUSTMENT LAYERS to add personal creative touches to your GLOW EFFECT
REQUIREMENTS
- Significant enough alterations are made to create a very different image than original.
- GLOW EFFECT looks like it belongs in the image (clean edges and transitions).
- IMAGE must be successfully retouched to remove blemishes before adding your GLOW EFFECT.
EXAMPLE
You can use this video from YouTube or follow the basic steps below to create your GLOW
BASIC STEP TO CREATE A GLOW IN AN IMAGE
1. HIGH-RESOLUTION IMAGE
|
USE a high resolution image for the assignment
and bring your downloaded image directly in PHOTOSHOP to begin - I like when you use your own photographs for this assignment (take a picture and email it to your school account to download) Drag & Drop your chosen portrait directly into Adobe PHOTOSHOP
Use the CROP TOOL
|
|

Choose W x H x Resolution and make sure you are using inches by typing "in" also make sure that "Delete Cropped Pixels" is checked
2. COPY YOUR BACKGROUND LAYER
Next, you want to copy your BACKGROUND LAYER - there are many ways to COPY a layer - here are two different ways:
|
Drag you layer to the ADD NEW LAYER button on the bottom of your LAYERS PANEL
|
OR you can use the LAYERS PANEL OPTIONS button and choose DUPLICATE LAYER
|
3. Use LAYER MASKS to remove and isolate content in your image
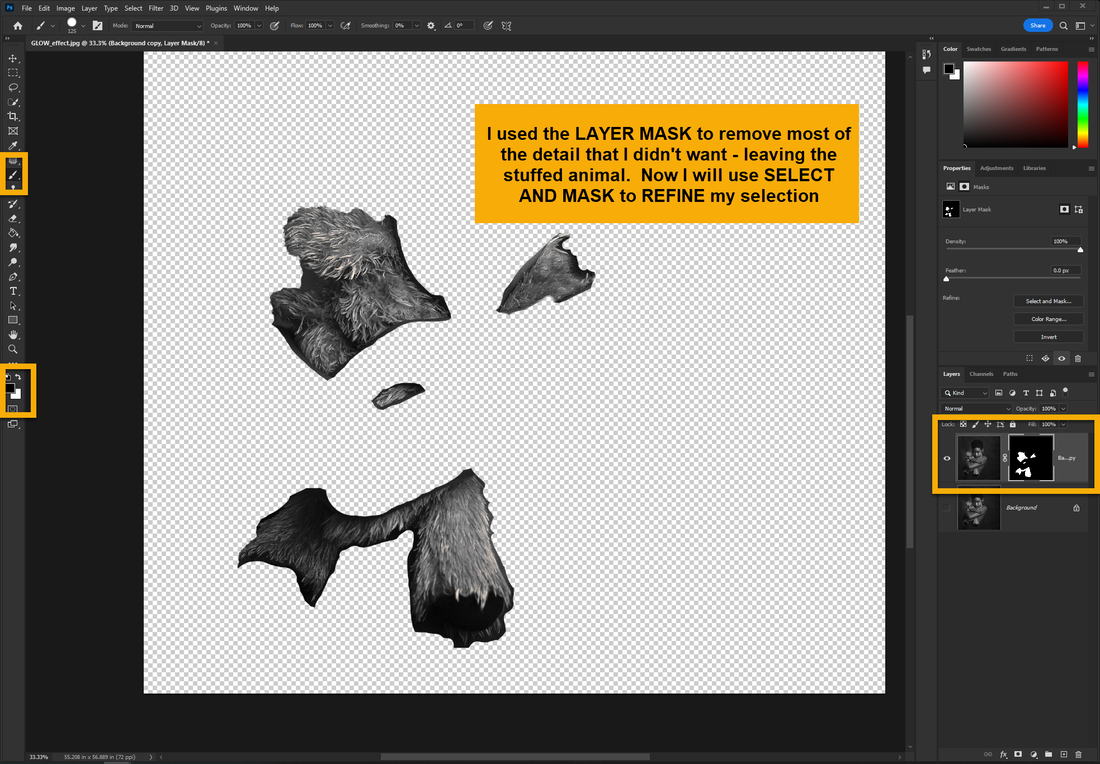
And REFINE YOUR SELECTION using SELECT and MASK
4. APPLY your LAYER MASK TO FINISH CUTTING OUT THE BACKGROUND
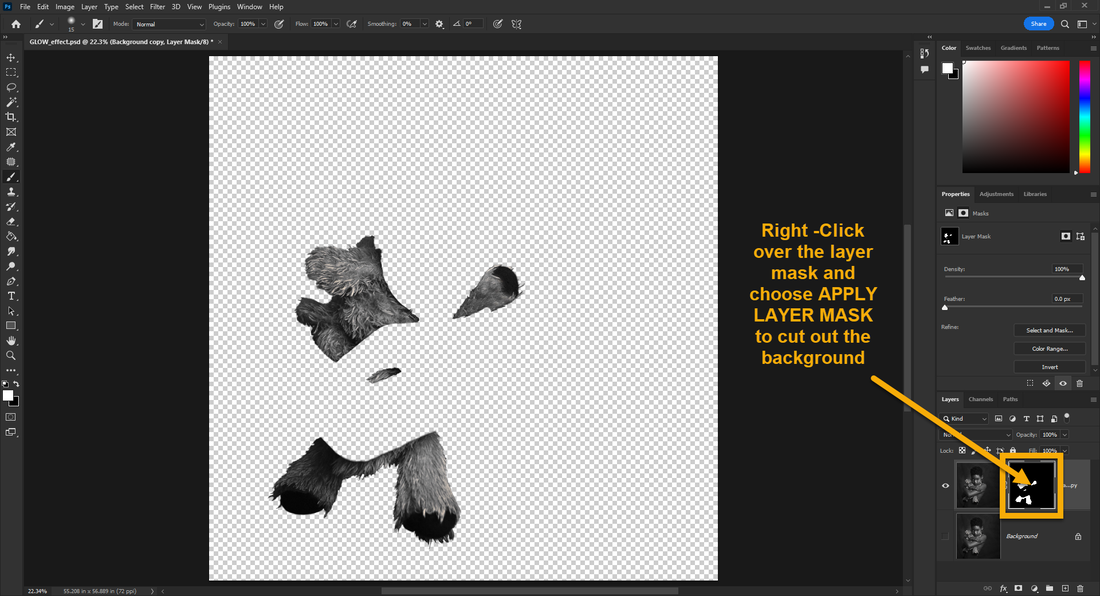
Make sure to rename your layers to stay organized
COLOR CORRECT YOUR IMAGE (AUTO)
|
You should always make sure your image has correct and pleasing color and contrast so In this step. try some basic color correction commands to improve your RETOUCH image and it's TONE, CONTRAST, & COLOR
IMAGE > AUTO TONE
IMAGE > AUTO CONTRAST IMAGE > AUTO COLOR If your image looks worse after auto adjustment just
EDIT > UNDO If the AUTO CORRECT functions do not improve image quality your may not need to make any corrections or you then may try some manual color corrections using commands like:
|
|
|
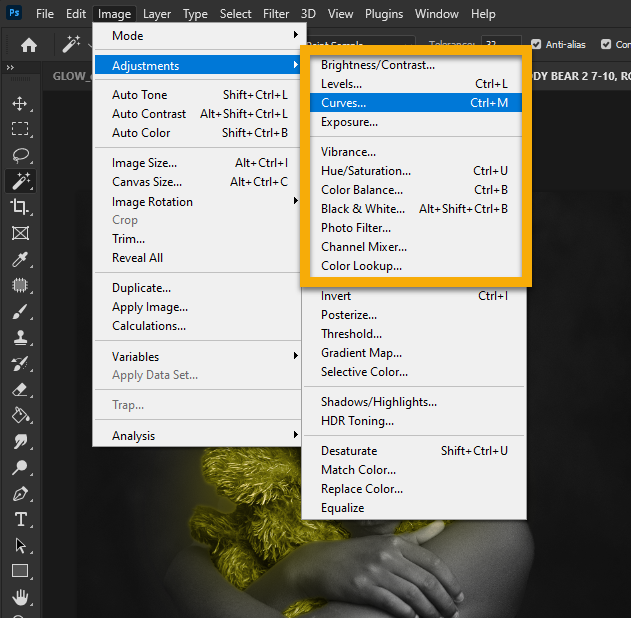
IMAGE > ADJUSTMENTS >
LEVELS, CURVES, EXPOSURE, VIBRANCE, HUE/SATURATION, COLOR BALANCE, ETC. |
|
SPOT HEALING BRUSH
|
|
OTHER HEALING TOOLS
|
Try some of the other healing tools to improve your image quality
|
|
5. COPY LAYERS | RENAME LAYERS | BLUR
These are the steps that show how to keep your layers organize by naming them as well as how to copy layers and BLUR them to create the GLOW EFFECT!
|
Copy layers and isolate objects so that you can adjust them individually.
Change the layer blend mode to SCREEN in the layers pallet
The figure was isolated here so that there could be individualize color and darkness adjustments - you can see an EXPOSURE adjustment layer used to darken the background
|
|
LAYER ADJUSTMENTS | Create the GLOW!
|
Use LAYER ADJUSTMENTS and refine LAYER BLENDING/OPACITY to achieve more dynamic results.
Here I grouped all the teddy bear layers by holding CTRL and selecting each layer I wanted to group and then click the GROUP BUTTON at the bottom of the Layers Panel
Use FILTER > BLUR > GAUSSIAN BLUR to create the GLOW EFFECT
|
|
|
Experiment with ADJUSTMENT LAYERS or IMAGE ADJUSTMENTS to fine tune the desired colors...
Use CLIPPING MASKS to control what layers are affected by your ADJUSTMENT LAYER - Right click on a layer and choose CLIPPING MASK so that an adjustment layer only affects the layer directly below your adjustment layer |
|
DODGE & BURN TOOLS
|
Lighten or darken parts of your image to create more dramatic effects
Use the DODGE TOOL to lighten areas of your image
Use the BURN TOOL to darken areas of your image
|
|

SAVE yOUR FILE AS A jpeg
|
TO SAVE AS A .PSD (Photoshop Document)
In the MENU commands -
TO SAVE AS A .JPEG (Image File)
In the MENU commands -
|
|
BE SURE TO CHECK THE FOLLOWING WHEN YOU ARE DONE...
|
Make sure to name your file: GLOW_yourlastname
Make sure to SAVE your file as a JPEG Make sure to SUBMIT both your .PSD file and your .JPEG file in SCHOOLOGY for assessment! Before you turn in your file check the RUBRIC in Schoology to see what will be assessed! |